BIOS nuostatos
PASTABA: Šiame skirsnyje pateikti BIOS ekranai skirti tik susipažinti.
Tikrieji ekranai gali skirtis priklausomai nuo modelių ir teritorijų.
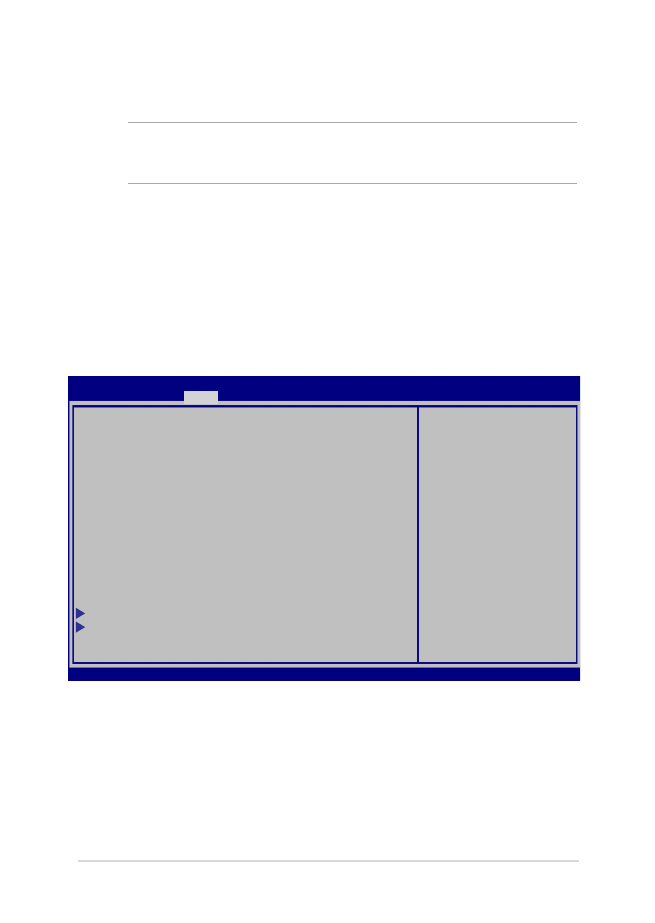
Įkrova
Šis meniu leidžia nustatyti įkrovos parinkčių prioritetus. Nustatydami
įkrovos prioritetus, galite vadovautis šiais veiksmais.
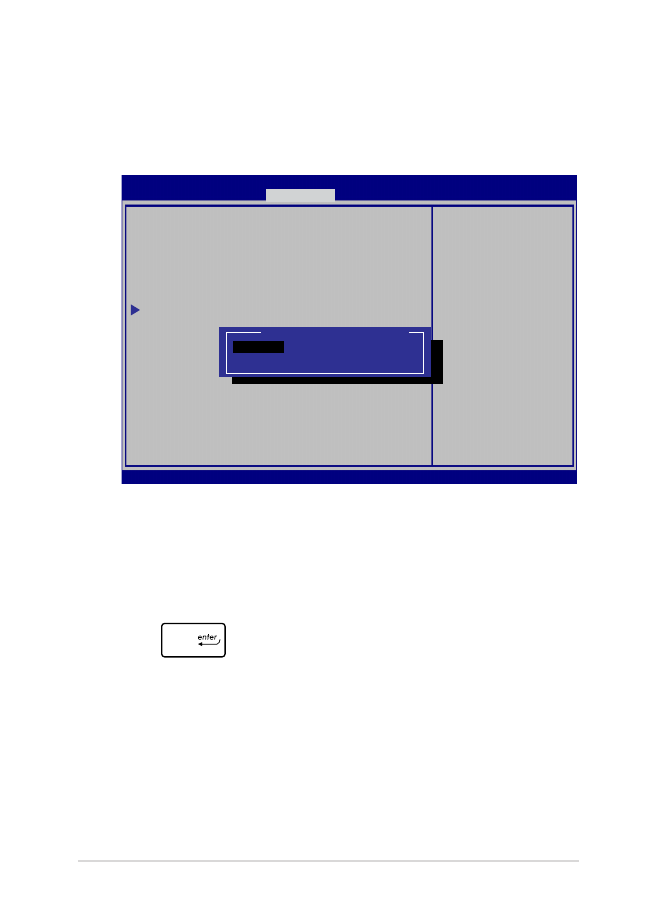
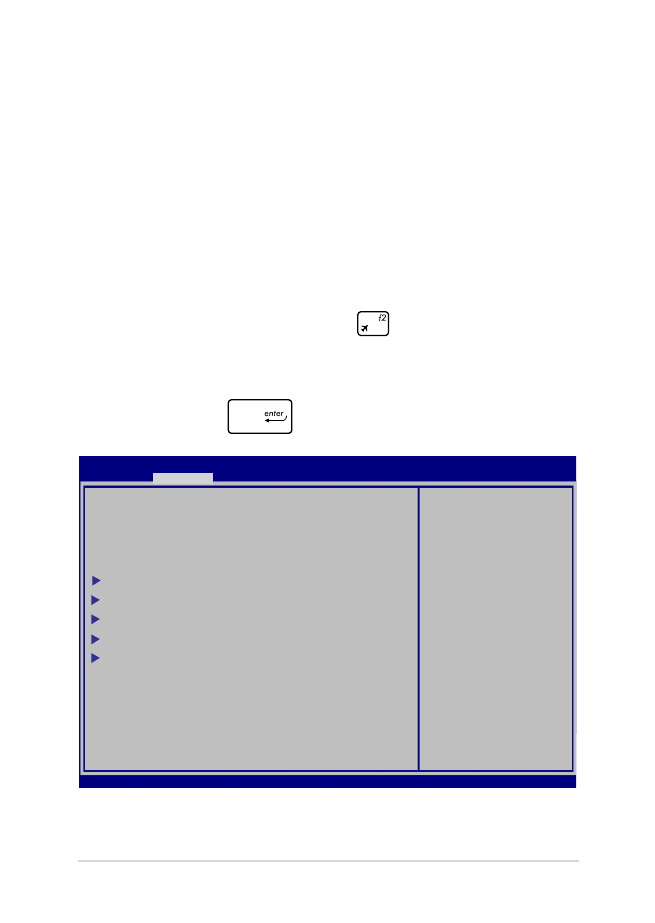
1.
Boot (Paleidimas) ekrane, pasirinkite Boot Option #1
(1 paleidimo parinktis).
→←
: Select Screen
↑↓
: Select Item
Enter: Select
+/— : Change Opt.
F1 : General Help
F9 : Optimized Defaults
F10 : Save & Exit
ESC : Exit
Boot Configuration
Fast Boot [Enabled]
Launch CSM [Disabled]
Driver Option Priorities
Boot Option Priorities
Boot Option #1 [Windows Boot Manager]
Add New Boot Option
Delete Boot Option
Sets the system
boot order
Aptio Setup Utility - Copyright (C) 2015 American Megatrends, Inc.
Main Advanced
Boot
Security Save & Exit
Version 2.15.1226. Copyright (C) 2015 American Megatrends, Inc.
72
Nešiojamojo kompiuterio elektroninis vadovas
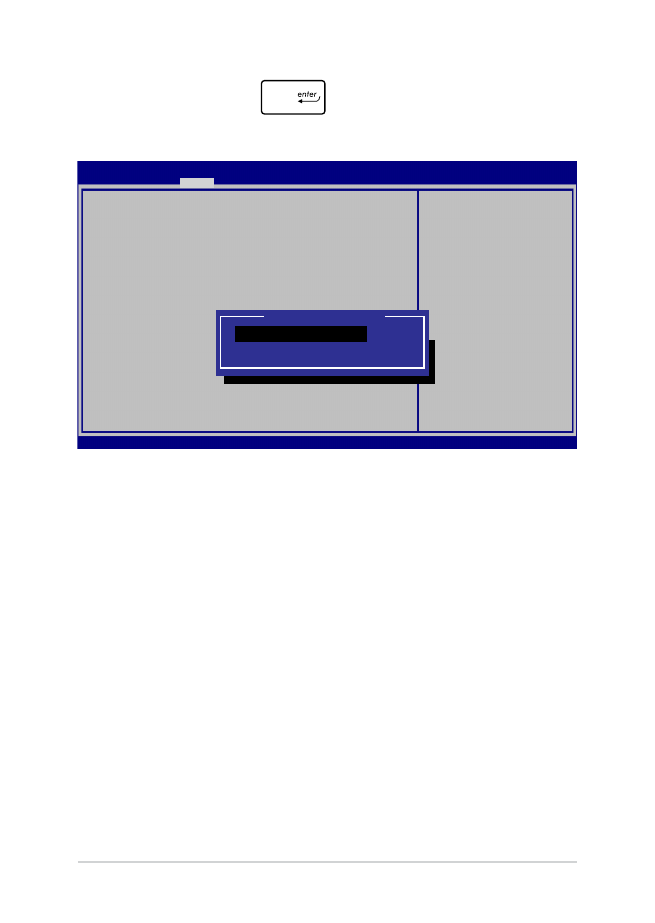
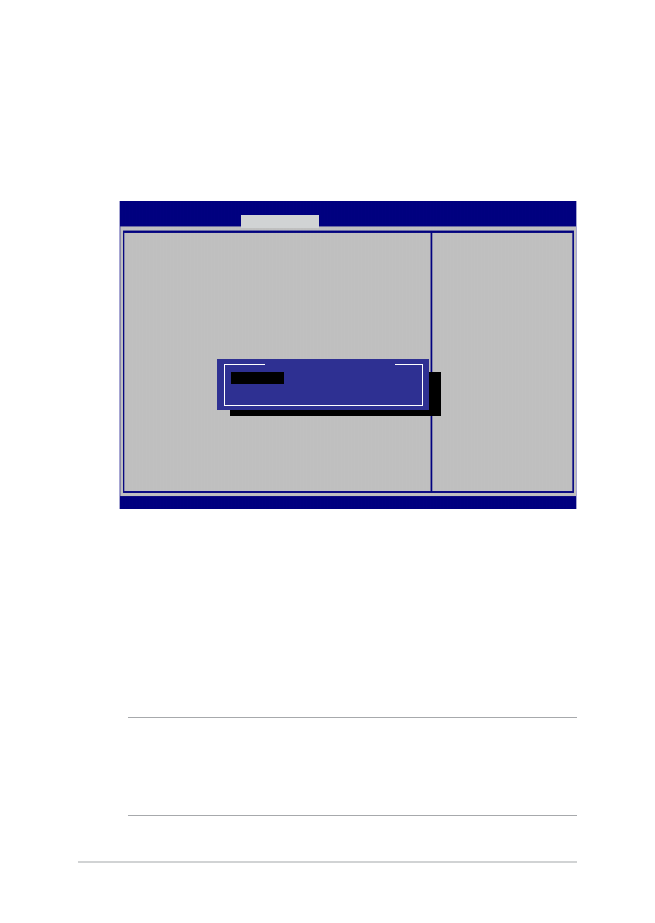
2.
Paspauskite klavišą
ir įrenginį pasirinkite kaip Boot
Option #1 (1 paleidimo parinktis).
→←
: Select Screen
↑↓
: Select Item
Enter: Select
+/— : Change Opt.
F1 : General Help
F9 : Optimized Defaults
F10 : Save & Exit
ESC : Exit
Sets the system
boot order
Aptio Setup Utility - Copyright (C) 2015 American Megatrends, Inc.
Main Advanced
Boot
Security Save & Exit
Version 2.15.1226. Copyright (C) 2015 American Megatrends, Inc.
Boot Configuration
Fast Boot [Enabled]
Launch CSM [Disabled]
Driver Option Priorities
Boot Option Priorities
Boot Option #1 [Windows Boot Manager]
Add New Boot Option
Delete Boot Option
Boot Option #1
Windows Boot Manager
Disabled
Nešiojamojo kompiuterio elektroninis vadovas
73
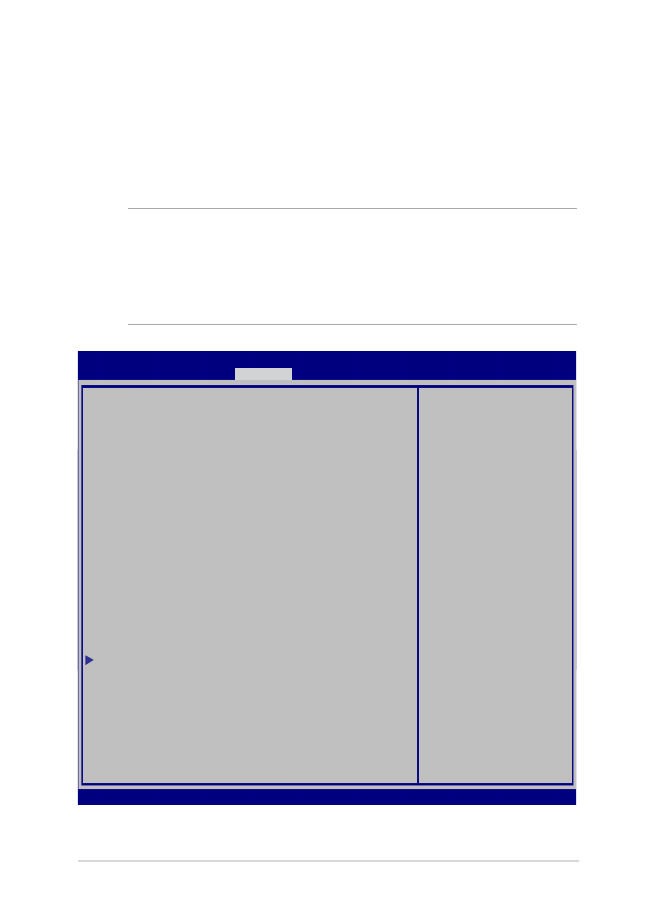
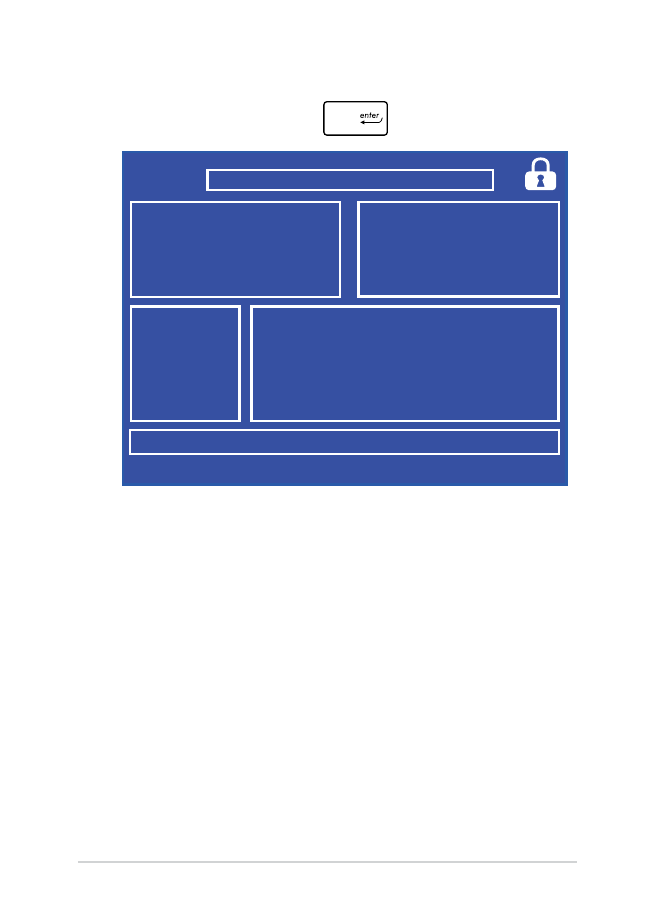
Apsauga
Šis meniu leidžia jums nustatyti nešiojamojo kompiuterio
administratoriaus ir vartotojo slaptažodžius. Jis taip pat leidžia jums
kontroliuoti prieigą prie jūsų nešiojamojo kompiuterio standžiojo disko,
įvesties/išvesties (I/O) sąsajos ir USB sąsajos.
PASTABA:
•
Jeigu nustatysite User Password (vartotojo slaptažodį), privalėsite
jį įvesti prieš paleisdami nešiojamojo kompiuterio operacinę sistemą.
•
Jeigu nustatysite Asministrator Password (administratoriaus
slaptažodį), privalėsite jį įvesti prieš atidarydami BIOS.
Password Description
If ONLY the Administrator’s password is set,
then this only limits access to Setup and is
only asked for when entering Setup. If ONLY
the user’s password is set, then this is a
power on password and must be entered to boot
or enter Setup. In Setup, the User will have
Administrator rights.
Administrator Password Status NOT INSTALLED
User Password Status NOT INSTALLED
Administrator Password
User Password
HDD Password Status : NOT INSTALLED
Set Master Password
Set User Password
I/O Interface Security
System Mode state User
Secure Boot state Enabled
Secure Boot Control [Enabled]
Key Management
Set Administrator
Password. The
password length
must be in the
following range:
Minimum length 3
Maximum length 20
Aptio Setup Utility - Copyright (C) 2015 American Megatrends, Inc.
Main Advanced Boot
Security
Save & Exit
→←
: Select Screen
↑↓
: Select Item
Enter: Select
+/— : Change Opt.
F1 : General Help
F9 : Optimized Defaults
F10 : Save & Exit
ESC : Exit
Version 2.15.1226. Copyright (C) 2015 American Megatrends, Inc.
74
Nešiojamojo kompiuterio elektroninis vadovas
Slaptažodžio nustatymas:
1.
Security (Saugumas) ekrane pasirinkite Setup Administrator
Password (Administratoriaus slaptažodžio nustatymas) arba
User Password (Naudotojo slaptažodis).
2.
Surinkite slaptažodį ir spauskite
.
3.
Slaptažodžio patvirtinimui surinkite jį pakartotinai ir spauskite
.
Slaptažodžio trynimas:
1.
Security (Saugumas) ekrane pasirinkite Setup Administrator
Password (Administratoriaus slaptažodžio nustatymas) arba
User Password (Naudotojo slaptažodis).
2.
Įveskite dabartinį slaptažodį ir paspauskite mygtuką
.
3. Lauką
Create New Password (Sukurti naują slaptažodį) palikite
tuščią ir paspauskite mygtuką
.
4.
Patvirtinimo langelyje pasirinkite Yes (taip), o tada paspauskite
.
Nešiojamojo kompiuterio elektroninis vadovas
75
I/O sąsajos apsauga
Apsaugos meniu galite gauti prieigą prie I/O sąsajos apsaugos,
kad užblokuotumėte arba panaikintumėte tam tikrų nešiojamojo
kompiuterio sąsajos funkcijų blokavimą.
Įv. / išv. sąsajos blokavimas:
1. Ekrane
Security (Apsauga) pasirinkite I/O Interface
Security (Įv. / išv. sąsajos apsauga).
2.
Pasirinkite sąsają, kurią norite blokuoti, ir spustelėkite
.
3. Pasirinkite
Lock (blokuoti).
I/O Interface Security
LAN Network Interface [UnLock]
Wireless Network Interface [UnLock]
HD AUDIO Interface [UnLock]
USB Interface Security
If Locked, LAN
controller will
be disabled.
Aptio Setup Utility - Copyright (C) 2015 American Megatrends, Inc.
Security
→←
: Select Screen
↑↓
: Select Item
Enter: Select
+/— : Change Opt.
F1 : General Help
F9 : Optimized
Defaults
F10 : Save & Exit
ESC : Exit
Version 2.15.1226. Copyright (C) 2015 American Megatrends, Inc.
LAN Network Interface
Lock
UnLock
76
Nešiojamojo kompiuterio elektroninis vadovas
USB sąsajos apsauga
Atidarę meniu I/O Interface Security (įjungimo/išjungimo
sąsajos apsauga), taip pat galite gauti prieigą prie USB Interface
Security (USB sąsajos apsaugos), kad užblokuotumėte arba
panaikintumėte prievadų bei prietaisų blokavimą.
USB sąsajos blokavimas:
1. Ekrane
Security (Apsauga) pasirinkite I/O Interface
Security (Įv. / išv. sąsajos apsauga) > USB Interface
Security (USB sąsajos apsauga).
2.
Pasirinkite sąsają, kurią norite blokuoti, ir spustelėkite Lock
(Blokuoti).
PASTABA: Nustačius USB Interface (USB sąsajai) parinkį Lock (blokuoti),
taip pat užblokuojami ir paslepiami External Ports (išoriniai prievadai)
bei kiti prietaisai, kuriems galioja USB Interface Security (USB sąsajos
apsauga).
Version 2.15.1226. Copyright (C) 2015 American Megatrends, Inc.
USB Interface Security
USB Interface [UnLock]
External Ports [UnLock]
CMOS Camera [UnLock]
Card Reader [UnLock]
If Locked, all
USB device will
be disabled
Aptio Setup Utility - Copyright (C) 2015 American Megatrends, Inc.
Security
→←
: Select Screen
↑↓
: Select Item
Enter: Select
+/— : Change Opt.
F1 : General Help
F9 : Optimized
Defaults
F10 : Save & Exit
ESC : Exit
USB Interface
Lock
UnLock
Nešiojamojo kompiuterio elektroninis vadovas
77
Set Master Password (nustatyti pagrindinį slaptažodį)
Apsaugos meniu galite naudoti parinktį Set Master Password
(nustatyti pagrindinį meniu), kad nustatytumėte prieigą prie
standžiojo disko įvedant slaptažodį.
HDD slaptažodžio nustatymas:
1. Ekrane
Security (Apsauga) spustelėkite Set Master
Password (Nustatyti pagrindinį slaptažodį).
2.
Įrašykite slaptažodį ir spustelėkite
.
3.
Slaptažodį patvirtinkite dar kartą jį įrašydami ir spustelėkite
.
4. Spustelėkite
Set User Password (Nustatyti naudotojo
slaptažodį) ir pakartokite pirmesnius veiksmus, kad
nustatytumėte naudotojo slaptažodį.
Aptio Setup Utility - Copyright (C) 2011 American Megatrends, Inc.
Set HDD Master
Password.
***Advisable to
Power Cycle System
after Setting Hard
Disk Passwords***
Aptio Setup Utility - Copyright (C) 2015 American Megatrends, Inc.
Main Advanced Boot
Security
Save & Exit
→←
: Select Screen
↑↓
: Select Item
Enter: Select
+/— : Change Opt.
F1 : General Help
F9 : Optimized
Defaults
F10 : Save & Exit
ESC : Exit
Version 2.15.1226. Copyright (C) 2015 American Megatrends, Inc.
Password Description
If ONLY the Administrator’s password is
set,then this only limits access to Setup
and is only asked for when entering Setup.
If ONLY the user’s password is set, then
this is a power on password and must be
entered to boot or enter Setup. In Setup,
the User will have Administrator rights.
Administrator Password Status NOT INSTALLED
User Password Status NOT INSTALLED
Administrator Password
User Password
HDD Password Status : NOT INSTALLED
Set Master Password
Set User Password
I/O Interface Security
78
Nešiojamojo kompiuterio elektroninis vadovas
Išsaugoti ir uždaryti
Norėdami išsaugoti konfigūracijos nuostatas, prieš uždarydami BIOS,
pasirinkite Save Changes and Exit (išsaugoti pakeitimus ir uždaryti).
Aptio Setup Utility - Copyright (C) 2015 American Megatrends, Inc.
Main Advanced Boot Security
Save & Exit
→←
: Select Screen
↑↓
: Select Item
Enter: Select
+/— : Change Opt.
F1 : General Help
F9 : Optimized Defaults
F10 : Save & Exit
ESC : Exit
Version 2.15.1226. Copyright (C) 2015 American Megatrends, Inc.
Save Changes and Exit
Discard Changes and Exit
Save Options
Save Changes
Discard Changes
Restore Defaults
Boot Override
Windows Boot Manager
Launch EFI Shell from filesystem device
Exit system setup
after saving the
changes.
Nešiojamojo kompiuterio elektroninis vadovas
79
BIOS atnaujinimas
1.
Sužinokite tikslų nešiojamojo kompiuterio modelį, paskui
atsisiųskite iš „ASUS“ tinklavietės naujausią jūsų modeliui tinkamą
BIOS failą.
2.
Išsaugokite atsisiųsto BIOS failo kopiją išoriniame atminties
įrenginyje.
3.
Prijunkite išorinį atminties įrenginį prie savo nešiojamojo
kompiuterio.
4.
Atlikite pakartotinę nešiojamojo kompiuterio sistemos keltį, o
tada, atliekant POST, paspauskite
.
5.
Naudodamiesi BIOS nustatymo programa, spustelėkite Advanced
> Start Easy Flash (išplėstinės nuostatos > „Start Easy Flash“),
tada spauskite
.
Aptio Setup Utility - Copyright (C) 2011 American Megatrends, Inc.
Start Easy Flash
Internal Pointing Device [Enabled]
Wake on Lid Open [Enabled]
Power Off Energy Saving [Enabled]
SATA Configuration
Graphics Configuration
Intel (R) Anti-Theft Technology Corporation
USB Configuration
Network Stack
Press Enter to run
the utility to
select and update
BIOS.
Aptio Setup Utility - Copyright (C) 2015 American Megatrends, Inc.
Main
Advanced
Boot Security Save & Exit
→←
: Select Screen
↑↓
: Select Item
Enter: Select
+/— : Change Opt.
F1 : General Help
F9 : Optimized Defaults
F10 : Save & Exit
ESC : Exit
Version 2.15.1226. Copyright (C) 2015 American Megatrends, Inc.
80
Nešiojamojo kompiuterio elektroninis vadovas
6.
Suraskite atsisiųstą ir išoriniame atminties įrenginyje išsaugotą
BIOS failą, po to paspauskite
.
7.
Po BIOS atnaujinimo proceso spustelėkite Exit > Restore
Defaults (išeiti > atkurti numatytąsias nuostatas), kad būtų
atkurtos sistemos numatytosios nuostatos.
FSO
FS1
FS2
FS3
FS4
0 EFI
<DIR>
ASUSTek Easy Flash Utility
[←→]: Switch [↑↓]: Choose [q]: Exit [Enter]: Enter/Execute
Current BIOS
Platform: G752
Version: 101
Build Date: Apr 26 2015
Build Time: 11:51:05
New BIOS
Platform: Unknown
Version: Unknown
Build Date: Unknown
Build Time: Unknown
FLASH TYPE:
Generic Flash Type

Nešiojamojo kompiuterio elektroninis vadovas
81